Sharpening hair clipper blades is a common practice. Although most manufacturers of hair clippers provide replacement blades, there are still instances when you’d have to sharpen the ones in use already. Most models can be sharpened through a few steps that don’t take less than 10 minutes.
What You Will Need
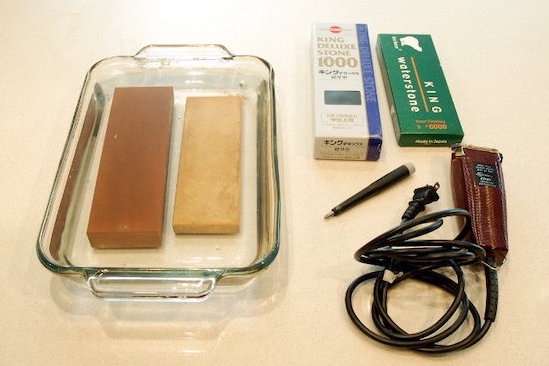
You don’t need a lot of materials to sharpen your hair clipper blades. You can purchase a blade sharpener or hone from your local store should you find yourself without the needed household tools. Blades sharpened with stones last longer as they don’t tear hair as much as those sharpened through other methods.
For this method, you need the following materials:
- Scalpel or metal nail file
- Household oil (to lubricate the blade)
- A small container for the oil
How to Sharpen Hair Clipper Blades: Steps to Follow
Table of Contents
Here are the steps on how to sharpen hair clipper blades with household items:
- Disassemble the Hair Clipper Blades
Turn your clipper off and disconnect it from the power source to avoid electric shock. Unplug the blades and insert them back in for safekeeping.
- Clean the Blade
Remove any waste from the surface. that may be lodged between the blade teeth using a screwdriver or another pointy tool. Clean it with clear water and allow it to dry.
- Mark the Blades
Locate the screws of your hair clipper. Use a screwdriver to remove them, taking the blades out of the unit.
- Sharpening stone or whetstone
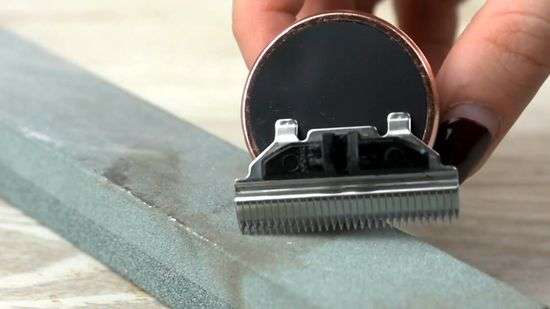
Using a flat file or stone, hold it at an angle slightly larger than 45 degrees and gently move it across each blade ten times until you hear a squeaking sound. As this happens, be sure to place all blades on a solid surface, such as a table. You can then proceed to the next blade or set of blades and repeat the process until done.
Put back the hairs clipper’s screws and insert both its head and cord into their respective slots. Ensure that it is plugged in before turning it on again to avoid electrical mishaps.
- Checking for loose screws or blades
Run the hair clipper at its highest possible speed to see if it’s working properly. If there are any problems, turn it off and disconnect from the power source before checking for loose screws or blades that need re-sharpening.
- Final Check
After finishing, run the blades against a fabric such as an old shirt or towel to catch loose hairs and bits that may be stuck on them. You can then stick back the removed screw and start using the hair clipper.
Also See: ClipperPro Reviews
Also See: Contours RX Lids By Design reviews
How to Deep Clean Your Hair Clipper Blades
Steps to follow:
Deep clean your hair clipper blades once in a while for them to be free from dirt and grime that may affect its performance.
You need the following materials:
- Spray bottle
- Warm water (tap or boiled)
- Screwdriver set
- Cleaning brush set
Disassemble the Hair Clipper Blades
Follow Steps 1 to 4 in “How to Sharpen Hair Clipper Blades” above.
Clean Your Hair Clippers’ Blades with Water and Soap
- Fill your spray bottle with warm water (an eye dropper may be helpful). Add a few drops of soap, like dishwashing liquid, for degreasing purposes.
- Shake the bottle to mix up its contents. Spray a generous amount of the solution on one blade and allow it to remain for a few seconds before wiping clean with your fingers or a cleaning brush. Do this step five more times per side of the blades until done.
- Rinse all blades thoroughly under tap water, being careful not to leave any soap residue on them. Shake the excess water from the blades and let dry for a few minutes before reassembling everything together.
How Often Should You Sharpen The Hair Clippers?
It is recommended that you keep your hair clipper blades as sharp as possible. Manufacturers who sell replacement sets of blades usually offer those meant to be used after the old ones have been worn out and dulled by constant use.
Sharpening your hair clipper’s blades takes about five minutes or less, which makes it a worthwhile process. Although it is not necessary, doing so will extend the life of your unit and help you save money on replacement blades.
Leave a Reply