Elfin Baby Booties

December 17, 2008
by Your Hostess

img_00012

If you have an hour to spare, you can still whip up a pair of these booties before Christmas! The pattern is easy and the optional jingle balls add just the right amount of ‘aawww’ factor. Enjoy! And happy holidays!

Size: 0 to 6 months

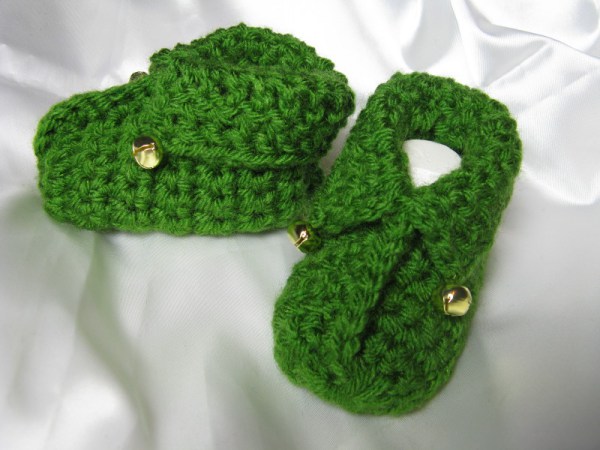
Materials: size G hook, Vanna’s Choice in Shamrock Kelly Green, four 9mm jingle balls (optional).

Gauge: 7 sc and 7 rows = 2 ins. (The finished sole is approximately 3 1/2″ long.)

Instructions: Chain 20

Row 1: Sc in 2nd chain from hook; sc in remaining; chain 1, turn. (19 sc)

Row 2 – 7: Sc across; ch 1, turn. Place markers at each end of row 7.

Row 8: Sc across; ch 1, turn.

Row 9: Dec 1 sc each side of row; ch 1, turn. (17 sc)

Row 10 -13: Sc across; chain 1, turn. (17 sc)

Row 14: Dec 1 sc each side of row (15 sc)

Turn. Do NOT yo. Draw up a loop in each of the next 15 sc; yo, draw through all 16 loops on hook; pull snugly; chain 1. Drop your yarn.

Fold bootie wrong sides together. Join length of yarn at base of heal, making sure wrong sides of piece are together. Sc up back of bootie to ankle. Fasten off, weave in ends.

Pick up dropped yarn at toe. Sc up to marked rows, then sc around ankle opening. Slipstitch into 1st sc at ankle opening. Chain 3; DO NOT TURN; dc at base of same stitch. Dc around to front center of ankle opening; chain 3; TURN; dc around*. Fasten off and weave in ends. Fold down cuffs at ankles and attach optional 9mm jingle balls securely with yarn at their corners or * incorporate the jingle balls into the stitches at the corners as you crochet them for maximum safety.


This is an original creation; the content of this pattern is copyrighted. You may print out pages for yourself, or for charity IF credit is given on each page to DIY Maven (aka: JoAnn Moser). You may link to this page with appropriate credit. However, publishing this pattern on other websites, in e-mails, mailing lists, in any print media, OR the selling of this pattern, or items made from it, is strictly forbidden.


39 Responses leave one →
  1. March 8, 2010
    Nita Hale permalink

    going to be a great-grandmother to!day. it,s a boy!Love the Elfin pattern. Can’t find how to get it

  2. March 1, 2010
    Your Hostess permalink

    Hi Miranda! When you say ‘on the front’ do you mean at the toe? Or from the toe up to the ankle? Because if it’s from the toe to the ankle, that’s easy to explain. After you single crocheted that seam together, you must have turned the bootie inside out.

  3. February 28, 2010
    miranda permalink

    hello,

    I’ve made the booties. They’re very beautiful.
    Somewhere along the pattern i went wrong, but i don’t know when.
    On my booties there is no row of stiches to be seen on the front of the foot. This row is in the inside of the bootie. Where did i go wrong?

    kind regards Miranda

  4. January 16, 2010
    Your Hostess permalink

    Hello Gail from Brisbane!!! I’m so glad you found the pattern!!

  5. January 16, 2010
    Gail permalink

    Hi from Brisbane Australia.
    Just found your pattern for Elfin bootees, awesome. I work with prem babies and hope to make lots for the ones in nursery xmas 2010
    thanks
    Gail

  6. October 15, 2009
    Rose permalink

    This pattern looks like a pair of crochet shoes. I have been looking for a while for something like this. I would like to know if there is a way to make this bigger(longer). I am real excited that I found this. Thank you

  7. October 7, 2009

    Yer welcome~it’s the least I could do! I’ve made many pairs of these now and am THRILLED with them! (((((HUGS))))) sandi

  8. September 29, 2009
    Your Hostess permalink

    Thanks for the hugs Sandi! And you’re very welcome!!!!

  9. September 29, 2009

    Just made one of a pair (without bells) to match an earflap hat (making for two different friends), and THESE ARE SOOO CUTE! *THANK YOU!* (((((HUGS))))) sandi

  10. September 21, 2009
    Your Hostess permalink

    Hi Gladis! At the end of row 14, turn the bootie over as if you’ll be making another row. Instead of making a row, however, draw up a loop as if you were making a single crochet, but DON’T draw up a second loop to create the stitch. Simply leave that first loop on and go to the second stitch in the row below and draw up another loop on your hook. You’ll do this all the way across the row, and by the time you get to the end, you’ll have 16 loops on your hook (15 plus the 1 from your turn from below). Then you’ll draw up another look and pull it through all 16 loops.

    After you’re done with this step, check out my comment below dated June 15th in response to La Cabra’s question. That should get you to the end!

    For a good on-line crochet tutorial, I usually refer people to Crafty Daisies. Their Crochet School is very good and not intimidating at all. Crochet Guild of America is a really good resource too. They even have separate instructions for left and right-handed people.

    I hope this helps! Let me know how they turn out!

  11. September 21, 2009
    Gladis permalink

    Hi. I’m really new at this and am still learning how to follow patterns. I’m having trouble understanding the pattern after row 14. Is there anywhere I can learn the terms or see online video demonstration?

    THANKS!

  12. July 21, 2009
    Your Hostess permalink

    You are VERY welcome!!!!

  13. July 21, 2009
    njssmommy permalink

    Thank you for a bootie pattern that is quick and easy. I taught myself to crochet and never have been able to figure out any other pattern for booties. I have made this several times now, and sometimes I leave off the jingle bells or use those tiny fabric flowers if it is for a little girl. I even got brave and switched up the cuff on the last pair, going in the round rather than turning and leaving off the jingle bells. I ran a piece of yarn around the cuff for a tie, and they worked great. All my friends that are expecting get a pair or two! Thank you again!

  14. June 15, 2009
    diymaven permalink

    It’s really easy! All you have to do is just stop using that yarn, or ‘drop’ it. Don’t finish it off because you’ll pick it up (or use it later). Fold the bootie in half, wrong sides together, and then take a length of yarn–about 2 feet at the most–and join that piece at the heal. Single crochet, using that new length of yarn, up the back of the bootie. Finish off with that length of yarn. Then go back to the one you dropped at the toe and single crochet up to the marked rows and around the ankle opening. Hope that helps. It sounds much more complicated that it really is…I promise!

  15. June 14, 2009
    La Cabras permalink

    I’m pretty new at this, so I do not understand when you say to drop yarn and sc up back of bootie to close, and then to pick up yarn at toe, I’m sorry I would love to do this cute booties,but I got lost on that part. Please help.

  16. February 19, 2009
    diymaven permalink

    Oh no! Well, let’s see…could you be doing single crochets instead of doubles for the cuff? Only the first row around the cuff is sc. The next two rows are dc’s. That should give you plenty to turn down.

  17. February 18, 2009
    Hannah permalink

    lol I must be doing something wrong as I cant figure out how they go together I make them exactly according to the pattern but I have no sharp corners like you do and I don’t have enough to roll over at the top to attach the bells to? any idea what Im doing wrong?

  18. February 9, 2009

    Thank you so much! They really are adorable and easy to make!!! Waiting for my son to see them! :) (still two months ahead)
    Thanks!

  19. February 7, 2009
    diymaven permalink

    Maria, I’m glad you liked the pattern, and how wonderful of you to make them for the newborns! That truly warms my heart!

  20. February 6, 2009

    Hi, I just wanted to tell you that these booties are so easy and so adorable that I was able to make them in a snap. I’ve decided to make lots of them to donate to the nearby hospital for the newborn babies. Now they can have a pair of booties to go home with. Thank you so much for sharing and God Bless you.

  21. January 28, 2009
    diymaven permalink

    Hey Evelyn. I used Vanna’s Choice so any worsted weight should work fine. You’ll need about 1.25 ounces for one pair of booties. I sent an e-mail messge to you too! Hope this helps!

  22. January 28, 2009

    I like these. I am making them for a gift. How much yarn do I need. What are the type yarns I can use. Thanks.

  23. January 27, 2009
    diymaven permalink

    Thanks for the kind words Janyce! I’m so glad the pattern worked for you!

  24. January 27, 2009
    Janyce permalink

    I made a pair of these last night and they are by far the easiest, cutest, and well made booties I’ve ever done, and I’ve made alot of them! I crochet tight, so had to use a “J” hook to get the gauge. I made a crocheted lace edging to cuff, they turned out adorable. Thanks so much for sharing this pattern!!

  25. January 25, 2009
    diymaven permalink

    Hello Greta! DC is short for double crochet in American crochet terms. I’ll e-mail you a link to a video demonstrating the technique.

  26. January 25, 2009
    greta permalink

    hallo i’m greta from italy, i wantmake you a quastion: what is the meaning of “dc” at the end of job? thank you for the answer. See you soon

  27. January 12, 2009
    diymaven permalink

    Thanks DeAnna. A bigger hook size will make them bigger–although I’m not sure just how much bigger.

  28. January 12, 2009
    DeAnna permalink

    Oh my gosh these are too freakin CUTE!!!! If I go up a hook size will that make them bigger? They are adorable I love how you did the closure for the toe.

  29. January 9, 2009
    diymaven permalink

    You’re very welcome, Rita!

  30. January 9, 2009

    Easy and quick. They came out so cute and I liked that they were tiny, just the right size. Thank you for the pattern.

  31. January 2, 2009
    diymaven permalink

    Any brand size G will work. Here’s a link to Lion Brand’s offering.

  32. January 1, 2009
    Ling permalink

    What size G hook should I use?

  33. December 30, 2008
    diymaven permalink

    Glad you like them!!

  34. December 30, 2008

    Too cute lol thanks.

  35. December 29, 2008
    diymaven permalink

    Thanks Carol! Glad you enjoyed making them!

  36. December 29, 2008
    diymaven permalink

    Glad you like it! That’s a great idea–and I have some Sugar and Cream in my stash too!

  37. December 28, 2008
    Carol permalink

    I made these yesterday 12/26 and they took about an hr. Very easy to make. They are too cute!!!!!!!!!! Thanx for the pattern.

    Carol

  38. December 26, 2008
    yvette permalink

    the only thing i can say is…. wow!!! JUST LOVE IT……
    thanks

Trackbacks & Pingbacks

  1. expanding my horizons « Renjet’s adventures in yarnery

Leave a Reply

Note: You can use basic XHTML in your comments. Your email address will never be published.

Subscribe to this comment feed via RSS